If you’ve been unlucky (like this writer!) you might have been stung once or twice by the dreaded roaming charges. But keeping in touch when abroad is an incredibly useful thing – from being able to contact home to making sure you’ve got the data to use Google Maps. If you want to flaunt the odd photo or two, or use that handy translation app – you need an internet connection, but don’t want to break the bank. That’s where an eSim comes in – a handy virtual sim that allows you to buy a temporary plan to avoid hefty charges.
But if it all sounds confusing – don’t worry! We’re here to explain how to use an eSim for travel – and give you some tips for setting it up.

What is an eSim?
eSim stands for ’embedded sim’ – in short, it’s a digital or virtual version of the SIM card that goes in your phone. When you purchase an eSim plan, you effectively purchase a temporary, travel-friendly version of a phone plan for whatever period of time you need it for – from 5 days to a month. Once you’ve arrived in the country you’re travelling within, you simply activate your eSim profile, and your phone uses that instead of your regular plan for the duration you’ve purchased it for.
In short, it’s a quicker, easier, and more environmentally-friendly way of changing your plan when travelling abroad. Nowadays, the majority of smartphones have eSim capabilities, meaning you can add eSim data plans to your phone for you to use.
Why should I buy an eSim?
eSims come with some very real advantages when travelling abroad. Firstly, they’re much more efficient at the purchase stage. While buying a traditional SIM means you’re waiting for a physical arrival at your home, buying an eSim means that the moment your confirmation email arrives, you’re ready to go. So, if you’ve left it to the last minute – never fear! As long as you’ve got an internet connection to get the eSim profile set up with ahead of travelling, you can buy this as close to the line as you dare.
There’s also the matter of cost – while price varies depending on which eSim operator you go with, eSims are often a far cheaper alternative to racking up international roaming charges from your standard plan. A two-week eSim for Japan might cost around £40-50, but this often comes with unlimited data (or larger data packages) that makes connecting to friends, family, and useful applications a breeze. For comparison, spending £20 a day on data might only buy you around 500MB from your domestic mobile operator, unless you’ve got a specific agreement with them on travel costs.
Traditional SIM cards are also a huge hidden eco-nightmare. As they’re mixed material – often made of plastic, metal, and valuable materials – they’re very difficult to recycle, and these processes are often complex themselves. An eSim, in comparison, doesn’t need the raw material resources, nor does it need disposing of at the end of its usage.

How to use an eSim abroad:
 Buying and activating an eSim is a simple process, but the steps might look a little different depending on your smartphone model. The eSim provider Holafly has specific instructions for phone types, but the basic process is the same.
- On the online store of the eSim operator you choose, you’ll navigate to your destination in order to see the range of available plans. If you’re travelling to one country, you can buy a specific plan – but if you’re travelling internationally (for example, if you’re on our 31-day Southeast Asia Adventure) you might want to buy based on a region. The amount of data you’ll get will vary based on where you’re travelling to, but you’ll be able to see your options.
- Choose the plan the suits you – based on the length of time you’re travelling for, and the amount of data you want. You’ll then purchase this in the same way you’d make any online purchase.
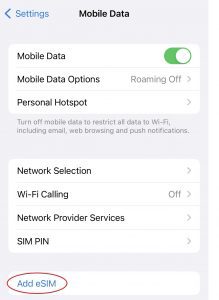
- You’ll receive an email with a QR code. Scan this with your phone’s camera (so open the email on a laptop or tablet), or head to Settings > Mobile Data > Add Data Plan (based on an iPhone 13) to do the same thing. Your email will also come with a step-by-step installation guide.
Once you’ve arrived at your destination, you simply navigate to the list of your SIM plans in your settings, and choose the eSim profile that you’ve already set up and named (so make it something you’ll remember!). Click through to that, toggle to turn it on, and activate your data roaming. After that, you’re good to go! This is a brief overview, but for more information on how to use an eSim, you’ll be able to find detailed set up instructions from whichever operator you choose to purchase through.
To sum up: travelling with an eSim is a much more efficient and wallet-friendly way to keep connected while you’re travelling in Asia. It’s about to be the journey of a lifetime – so using an eSim ensures that there’s one less stress on your mind, leaving you free to enjoy your travels.
We’ve partnered with Holafly, who provide great-value eSims that keep you connected when you’re travelling. Click the below, or head to esim.holafly.com and enter code DRAGONTRIPS at checkout for a 5% discount on the cost of your eSim.
